Xero Setup for Your Small Business (2026)
Step-by-Step Guide



If you are doing your taxes for the first time this year, maybe because you've just started a new business, don't worry, it's actually quite easy. And it looks like you've chosen Xero for your bookkeeping. Good choice, because Xero is tailoring its platform towards exactly you (and my audience): the small business owner. So you're in good hands. You can set up Xero on your own, no accounting expertise needed. Just follow my Xero setup guide and you'll find your way around the software in no time. And if you already work with an accountant, you can invite them into your Xero account so you both work from the same numbers.
If you are a beginner, these are the absolute basics you'll be doing in Xero going forward:
- Bank reconciliation: mapping your bank statements to existing invoices, bills, and receipts
- Creating invoices within Xero
- Doing your taxes at the end of the fiscal year and pulling tax statements from Xero
There are other things too, but this is basically what your Xero setup is for right now.
Before we get into the Xero setup itself, let's take a step back and figure out if you're even on the right plan. You can always upgrade as you go and grow your business, but especially as a small business, you don't want to end up on a higher plan than you need and pay for features you're not using. The main factor to pick your plan by is how many invoices and bills you're sending and receiving each month. By the way, with my link you can get 80% off for the first 6 months, just click the pink button below!
Xero runs these three plans in the US. The prices below are US pricing at the time of publication (October 2026). Pricing is subject to change and differs by region, so check Xero's site for your country.
Early, $27/month. Good for sole traders, new businesses, and the self-employed. You get quotes and up to 20 invoices, online invoice payments, 5 bills, bank reconciliation, Smart Document Capture, real-time reports, W-9 and 1099 management, sales tax, basic performance graphs, a 30 day cash flow forecast, and free ACH bill payments. Auto-reconcile is available as an add-on for $5/month.
Growing, $59/month. Built for businesses that have moved past the basics. Everything in Early, plus unlimited invoices and quotes, automated bill entry and tracking, auto-reconcile for bank transactions, tailored financial health scorecards, customizable performance dashboards, budgeting with smart suggestions (up to 3 budgets), and a 60 day cash flow forecast.
Established, $97/month. Meant for scaling businesses. Everything in Growing, plus multiple currencies, KPI and ratio analysis, project time and cost tracking, employee expense and mileage claims, international bill payments, industry benchmarking, and a 180 day cash flow forecast.
One thing worth knowing: payroll is not bundled into the price, no matter which plan you're on. In the US it runs as an add-on called Xero Payroll, powered by Gusto, which costs $36/month plus $6 per employee or contractor. So if you have employees, budget for that separately.
The first step of your Xero setup is super easy. You confirm your email, answer a few questions about your business, set a password and your fiscal year, plus other business details like your tax and registration number, so you don't have to think about it later.
One thing to get right the first time: your base currency. Xero doesn't let you change this once you're set up. So pick your actual operating currency now, not just whatever your country defaults to. Your financial year-end can technically be changed later, but it's enough of a hassle (with adjustment periods and everything) that it's worth setting it correctly from the start, too.
Also set up multifactor authentication here to make sure no one else can access your financial data.
If your bank supports it, you can connect it directly and get a live feed of your transactions into Xero. "Live" is relative though, most feeds update once or a few times a day rather than instantly, and it depends entirely on your bank. You can connect multiple bank accounts at once, and payment processors like Stripe or PayPal can be part of that feed too. Connect everything you use so you get a true, complete picture of your finances later.
If you don't have a bank feed (like I don't with my bank), you manually import statements instead. Supported formats are OFX (my preferred one), QFX, QIF, QBO, or CSV. Mapping columns to Xero's fields is simple, you just match the original column names to the right Xero values.
You can make reconciling this a monthly or weekly ritual, depending on how many transactions you get and how much visibility you need into your current financial situation. I do this monthly.
Decide from when you officially want to start doing your accounting in Xero. If that's before your sign-up date, this becomes your go-live date, and you'll need to upload your older invoices too. For example, if I signed up to Xero in March and want to do my full-year taxes in Xero, I'd need to upload my invoices from January through that date as well.
Once you've settled on that date, enter your opening balances as of then, ideally pulled from your last financial statements or previous software.
If you work with an accountant, bookkeeper, or anyone else on your books, this is where you bring them in. Every Xero plan lets you add users at no extra cost, so there's no reason to share your own login around.
The roles worth knowing:
Advisor: full access to everything, including sensitive financial data and settings. This is what you give your accountant or bookkeeper.
Standard: access to the day-to-day stuff, invoices, bills, bank reconciliation, without touching organization settings or the subscription itself. This is what most staff should get.
Read only: can view reports and transactions but can't create or edit anything. Good for someone who just needs visibility.
Keep the Advisor role reserved for people who actually need it. It's tempting to just make everyone an admin so you don't have to think about it, but that's exactly how mistakes and unauthorized changes happen.
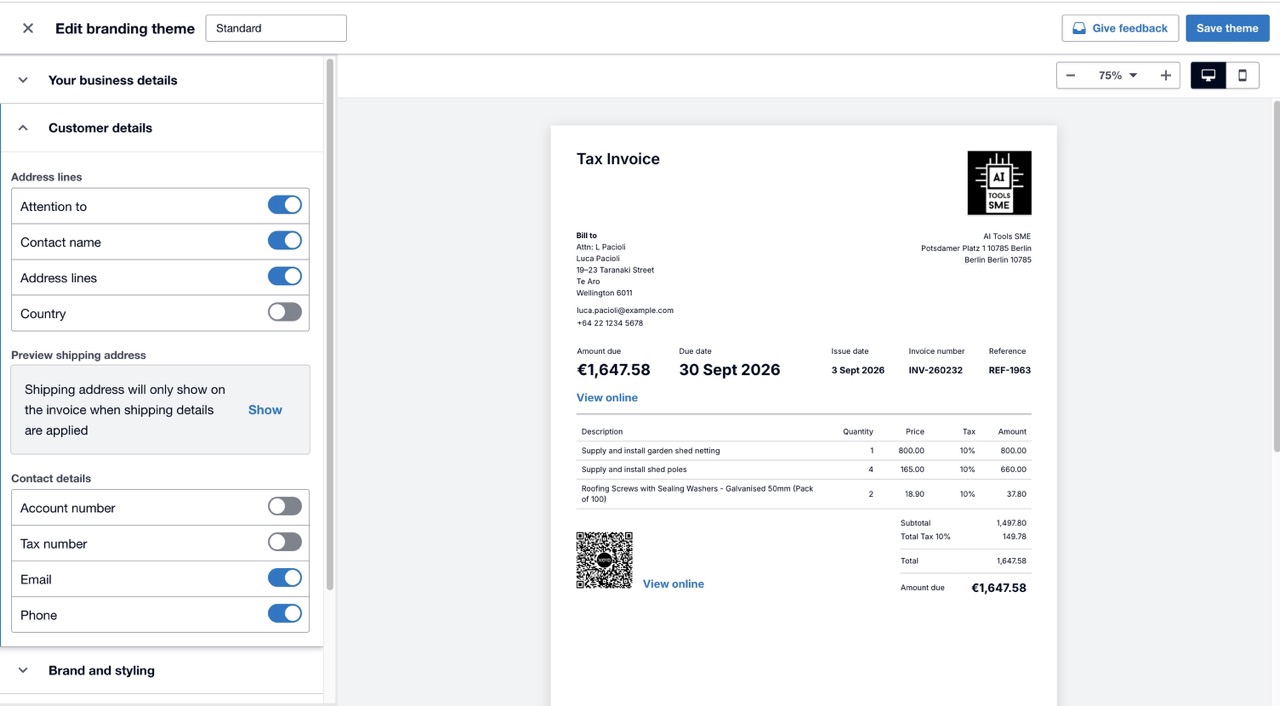


Add your logo and payment terms to your invoice templates. There are a lot of settings you can preselect: alternative addresses, which business details show up, credit card payment details, even the invoice title itself. I'd stick to the basics at first and build up from there.
You can create multiple templates for different business cases too, Xero allows up to 15 branding themes, so if you invoice under different business names or need different layouts for different clients, you've got the room to do that.
Connect Stripe or GoCardless so clients can pay online directly from the invoice. This is a different step to connecting a PayPal feed. Connecting PayPal as a feed brings your PayPal transactions into Xero the same way a bank feed would, so you can reconcile them. Stripe and GoCardless instead add a "Pay now" button to the invoice itself. Stripe handles card payments, Apple Pay, and Google Pay, and feeds the transaction back into Xero for reconciliation. GoCardless handles direct bank-to-bank debits, which work well if you bill the same clients on a recurring basis. Both are worth having if you invoice regularly.
If you have employees, you'll need to set up payroll separately, since it's not included in any plan by default. In the US, this runs through Xero Payroll, powered by Gusto, and covers pay runs, automated tax filings, direct deposit, and contractor payments, all flowing straight into your Xero ledger so your wage costs actually show up in your books without manual entry.
If you don't have employees yet, skip this step entirely, you can always come back to it later.
This is where you match your invoices to your bank transactions. Since we've only just finished the Xero setup, I'd only do a handful of reconciliations for now. Ideally the bank rules we're setting up too should take over most of this work for you, meaning way less manual matching going forward.
Bank rules are divided into three areas: Spend money rule, Receive money rule, and Transfer money rule. Once these are set up, Xero recognizes recurring transactions on its own and sorts them accordingly, so you're mostly just confirming instead of categorizing everything by hand. I kind of love this feature, and so will you!

Do the numbers roughly check out here? If yes, you've probably connected everything correctly and you're ready to go.
If you already have a bit of data inside Xero, this is also a good moment to test JAX or the AI insights in the Analytics dashboard. Both will become your best accounting software friends later. I won't go deep into this now since I've written a full post on it here.
Our Xero setup isn't a one-and-done thing. Once you're up and running, plug reconciling into your routine, either weekly or monthly, depending on your transaction volume and how much visibility you want into your current financial situation. I do mine monthly, since that's often enough for me to still remember the context behind each transaction, but if you're processing a lot of transactions or want a tighter grip on cash flow, weekly makes sense.
Beyond reconciling, check in on your reports every so often, they're the payoff for setting everything up properly in the first place.
These are the first steps for getting started with your Xero account. I recommend being patient with yourself and taking time to get a feel for the system. Most knots untie themselves after a few weeks of working with it, but if you're still stuck after that, jump on a call with one of Xero's coaches. These are free, one-on-one onboarding calls for the first 90 days, and they can answer your questions and get you unstuck.